Create a looping background video player with SwiftUI + UIKit
Learn how to add looping background videos to your SwiftUI app with this easy and straightforward tutorial.

Making apps sexier with looping mesh gradient videos is a trend no designer wants to miss out on. Unfortunately, there's no simple way of adding a looping video player directly in SwiftUI. However, with a few lines of UIKit code and UIViewRepresentable, we can easily make a looping video View which we can use anywhere in SwiftUI!
Let's dive right in.
Create a UIView class
Let's begin by creating a class LoopingPlayerUIView which is a UIView and it will hold all the logic for playing and looping our videos. Later, we'll use this class in a UIViewRepresentable to make it work with SwiftUI.
Create a new file LoopingVideoPlayer.swift and write the following code:
import SwiftUI
import AVKit

class LoopingVideoPlayerUIView: UIView {
    init() {
        super.init(frame: .zero)
    }

    required init?(coder: NSCoder) {
        fatalError("init(coder:) has not been implemented")
    }
}
Here, we are creating a new class which is of UIView type and has the required initializers. It's mostly boilerplate code for creating a custom UIView class so we don't need to worry about the specifics.
Now let's modify the code a bit so that we can supply and use a filename. We'll instantiate our video player item with this file. This is how the updated init method will look like:
init(fileName: String) {
    super.init(frame: .zero)

    guard let filePath = Bundle.main.path(forResource: fileName, ofType: "mp4") else {
        print("LoopingVideoPlayerUIView: file \(fileName) not found")
        return
    }

    // Load the asset
    let fileUrl = URL(fileURLWithPath: filePath)
    let asset = AVAsset(url: fileUrl)
    let playerItem = AVPlayerItem(asset: asset)
}
Here, we first check whether the file with the name fileName exists. If not, we print an error and exit (in production, you may want to have a better error handling, or provide a fallback video).
After we have the full path of the file, we first get the URL from that path and create an AVAsset with this URL. Finally, we instantiate an AVPlayerItem with the asset we just created.
Important: Make sure that the video file is added to the project. To do this, drag & drop the file into any folder within the Project Navigator in Xcode, ensuring that the target membership is correctly set. Do not place the video in the Assets.xcassets as this directory is primarily for image assets and colors, otherwise the above lookup will fail.
Now let's add the player view which will render our video:
class LoopingVideoPlayerUIView: UIView {
    private var queuePlayer = AVQueuePlayer()
    private let playerLayer = AVPlayerLayer()
    private var playerLooper: AVPlayerLooper?

    init(fileName: String) {
        super.init(frame: .zero)

        guard let filePath = Bundle.main.path(forResource: fileName, ofType: "mp4") else {
            print("LoopingVideoPlayerUIView: file \(fileName) not found")
            return
        }

        // Load the asset
        let fileUrl = URL(fileURLWithPath: filePath)
        let asset = AVAsset(url: fileUrl)
        let playerItem = AVPlayerItem(asset: asset)

        // Set up the player
        self.queuePlayer.isMuted = true
        self.playerLayer.player = self.queuePlayer
        self.playerLayer.videoGravity = .resizeAspectFill

        // Setup the playerLooper which takes care of the looping for us
        self.playerLooper = AVPlayerLooper(player: self.queuePlayer, templateItem: playerItem)
        self.queuePlayer.play()

        // Insert the player layer to our view's layer
        self.layer.insertSublayer(self.playerLayer, at: 0)
    }

    override func layoutSubviews() {
        super.layoutSubviews()
        playerLayer.frame = self.bounds
    }

    required init?(coder: NSCoder) {
        fatalError("init(coder:) has not been implemented")
    }
}
There's quite a lot happening here so let's break it down:
Our class properties
queuePlayer: This is an instance ofAVQueuePlayer. While standard players likeAVPlayerplay one video and stop,AVQueuePlayercan handle a series or queue of videos, playing them in sequence. This makes it ideal for our goal — to loop a single video, we essentially make it feel like it's a series of the same video playing back-to-back.playerLayer: Here, we're working withAVPlayerLayer. It's like a visual outlet for our player. In simpler terms, ifAVQueuePlayeris the engine that drives the video,AVPlayerLayeris the screen where it gets projected.playerLooper: EnterAVPlayerLooper! This guy is responsible for taking our video and ensuring it loops endlessly. It ties perfectly with ourqueuePlayer, allowing us to create that seamless loop effect without any hiccups or pauses.
Setting up the player
- First things first: we mute our video player because nobody likes autoplay with sound. You can skip it if you want your videos to have sound.
- Next, we set the video's
videoGravityto.resizeAspectFill. This ensures that our video scales to fill the size of the view. The aspect ratio of the video is maintained, and the video will be cropped if needed to fit the view. - Now that our player is set, we bring in
playerLooperto ensure the video loops. We initialize it with thequeuePlayerand the video asset. - Finally, we layer our video canvas (
playerLayer) onto our UIView, making our looping video visible.
Adjusting the layout
- We override the
layoutSubviewsfunction so whenever our SwiftUI view gets resized or redrawn, this function ensures our video fits the size of our view.
Now all we need to do is make it work with SwiftUI.
Bridging with SwiftUI
To make LoopingVideoPlayerUIView work with SwiftUI, we'll first have to create a UIViewRepresentable struct.
In SwiftUI, there might be times when you need to use components from UIKit, the older iOS framework. UIViewRepresentable acts as a bridge to do just that. It lets you use and manage UIViews within SwiftUI.
So let's create one. Add the following code to the same file above the class definition of LoopingVideoPlayerUIView.
struct LoopingPlayerView: UIViewRepresentable {
    var fileName: String

    func makeUIView(context: Context) -> UIView {
        return LoopingVideoPlayerUIView(fileName: self.fileName)
    }

    func updateUIView(_ uiView: UIView, context: Context) {}
}
Here, we are creating a UIViewRepresentable and we have also supplied fileName as the parameter.
There are two key functions here: makeUIView and updateUIView.
- With
makeUIView, we're instructing the system to create ourLoopingVideoPlayerUIViewusing the designated video file. - On the other hand,
updateUIViewis designed to adjust our UIView in case of any changes. However, since our setup remains constant, we've left this function empty.
And now we can use this directly in any SwiftUI view wherever we want looping videos!
Looping video in SwiftUI
To use this in SwiftUI, we can simply add it as the background of any view like so:
struct ContentView: View {
    var body: some View {
        ZStack {
            ZStack {
                LoopingPlayerView(fileName: "starry-night")

                Color.black
                    .opacity(0.25)
                    .blendMode(.plusDarker)
            }
            .ignoresSafeArea()

            VStack {
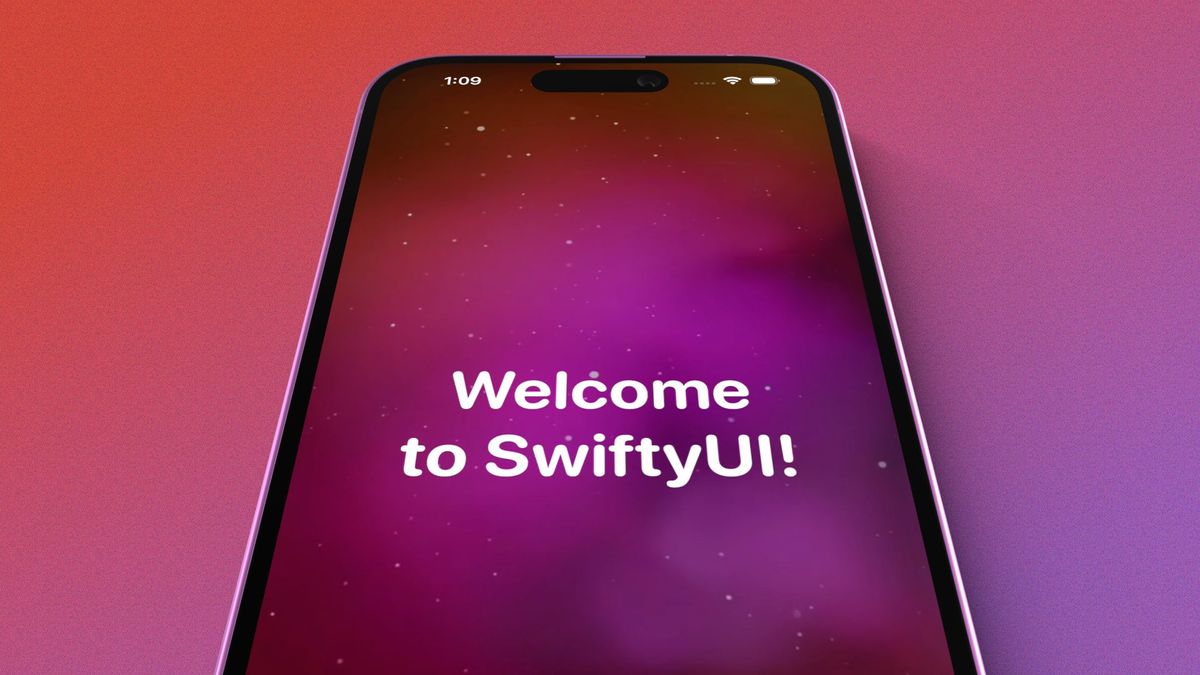
                Text("Welcome to SwiftyUI!")
                    .font(.system(size: 48, weight: .bold, design: .rounded))
                    .multilineTextAlignment(.center)
                    .foregroundColor(.white)
            }
        }
    }
}
and this is how it looks like:
So there you have it! A looping background video player which you can use in your SwiftUI apps.
Final tips
Before wrapping up, here are some tips to save you from a couple of potential pitfalls.
Audio mixing issue
If the video contains any audio, it might interrupt any background music or podcasts. To prevent that, add the following code at the beginning of the init function:
_ = try? AVAudioSession.sharedInstance().setCategory(AVAudioSession.Category.playback, mode: .default, options: .mixWithOthers)- The
playbackcategory tells the system that our app wants to play some audio. mixWithOthersis like a friendly setting. It tells the system, "Hey, let's play our sounds, but don't stop other apps from playing theirs."
Video pauses on app resume
Sometimes, the video will pause when you bring your app to the foreground from a suspended/minimized state. The video will not start again until you rerender the view somehow. To solve this, we have to do the following:
- Register for the
willEnterForegroundNotification - Implement a method to refresh the player
In your init method, add the following line at the bottom to register for this notification:
NotificationCenter.default.addObserver(self, selector: #selector(playItem), name: UIApplication.willEnterForegroundNotification, object: nil)Then, create a new function to remove and insert the player again.
@objc private func reinsertPlayerLayer() {
    self.queuePlayer.play()
    self.playerLayer.removeFromSuperlayer()
    self.layer.insertSublayer(self.playerLayer, at: 0)
}
Why @objc?
This is just a way to tell Swift, "Hey, I want this function to be available in the Objective-C world." It's needed because the notification system, originally from Objective-C, wants to see functions in a way it understands.
Finally, for avoiding any potential memory leak issues, stop listening to the notification when it's no longer needed.
deinit {
    NotificationCenter.default.removeObserver(self, name: UIApplication.willEnterForegroundNotification, object: nil)
}
And that's a wrap! Hope you enjoyed this tutorial. Feel free to leave a comment if you have any questions. Make sure to subscribe below to get these articles delivered right to your inbox.

Comments ()